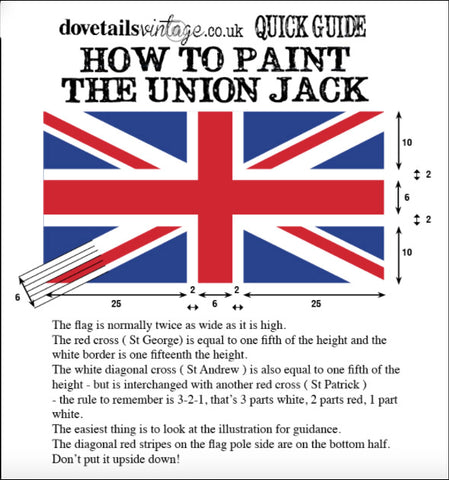
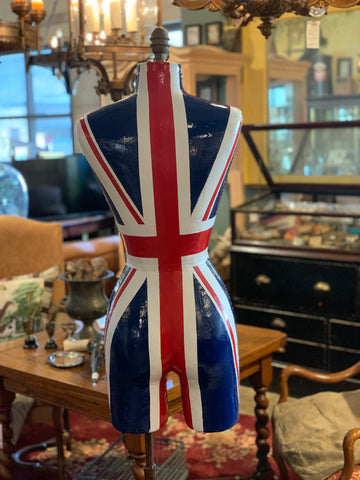
Feeling a little crafty and ready for a challenge? This Union Jack flag mannequin is the perfect DIY for you. Bound to be a statement piece and something people will be talking about, you can feel proud of this DIY. Please note: It can be a little challenging to figure out how to lay it all out. We laid it out by judging how it looks. Feel free to use the diagram below if you're good with math.
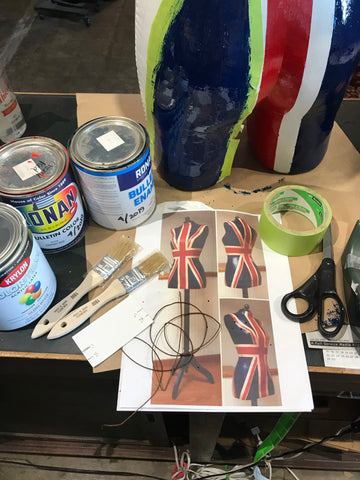
These are the items we used to create this Union Jack style Mannequin.
1) MANNEQUIN - depending on the length of the torso will depend on how you paint the flag. The one we chose had a longer body, and it worked out just fine. Don't worry if the mannequin you find has stains or discoloration as it will eventually be covered.
2) GESSO
3) SANDPAPER
4) WHITE GLOSSY LATEX PAINT
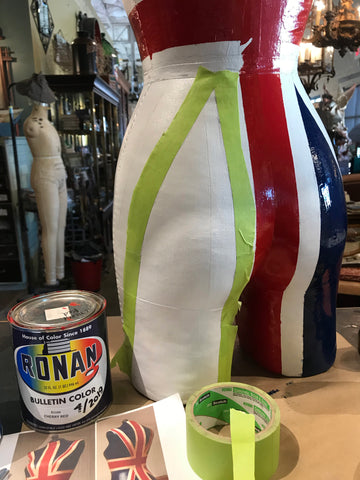
5) RONAN ENAMEL LETTERING PAINT - CHERRY RED, DARK BLUE
6) CHIP BRUSHES
7) 3M SCOTCH TAPE #2060 (concrete, brick, and grout) - this worked well with the gesso surface but some of the paint did peel off. We suggest using a blue painters tape.
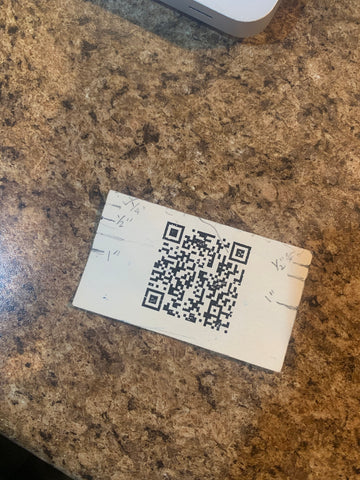
8) BUSINESS CARD OR THICK PIECE OF PAPER
9) RULER
10) PENCIL
11) STRING
1) MANNEQUIN - depending on the length of the torso will depend on how you paint the flag. The one we chose had a longer body, and it worked out just fine. Don't worry if the mannequin you find has stains or discoloration as it will eventually be covered.
2) GESSO
3) SANDPAPER
4) WHITE GLOSSY LATEX PAINT
5) RONAN ENAMEL LETTERING PAINT - CHERRY RED, DARK BLUE
6) CHIP BRUSHES
7) 3M SCOTCH TAPE #2060 (concrete, brick, and grout) - this worked well with the gesso surface but some of the paint did peel off. We suggest using a blue painters tape.
8) BUSINESS CARD OR THICK PIECE OF PAPER
9) RULER
10) PENCIL
11) STRING
STEP 1: To begin, cover a surface with painters cloth or paper to protect the area. Paint gesso all over the mannequin and let dry completely. Sand smooth and repeat the process 2 to 3 times until the surface becomes smooth. Make sure the mannequin dries entirely before moving on to the next step. It's best to let it sit for 24 hours or more.
STEP 2: Once you have a good surface to work with, cover the entire surface with glossy white paint. We used latex paint because that is what we had, and it worked well for the mannequin. Make sure it dries for 24 hours before you begin the next step.
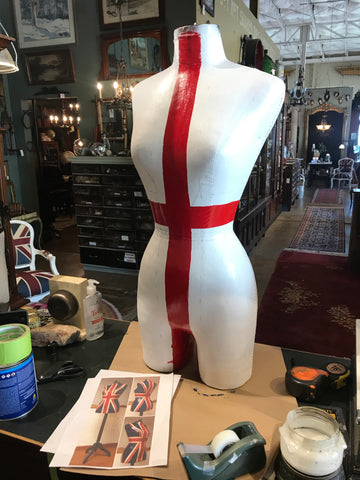
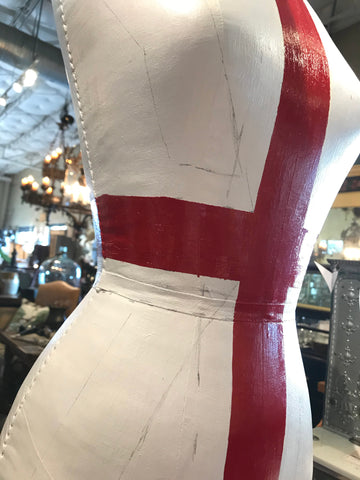
STEP 3: It can be a little daunting to know where to begin to paint the flag. We suggest starting with the red vertical 2" centerline. Measure the width of the mannequin and divide it by two to get your center point. From your center point, measure out 1" on either side of it to create your 2" line. This is where the business card comes into play. A business card was an easy card for us to grab. On the card, we measured out 1/4", 1/2", and 1". We then used the card to measure up the mannequin on the front and the back to create a vertical 2" line. A pencil works excellent for marking on the mannequin. Please note: A magic eraser works wonders on removing the pencil marks.
STEP 4: Using our eye, we then judged where we wanted the red horizontal 2" line. To us, visually, it looked better a little higher on the waistline. We then measured out a 2" line all around using the business card. To do this, it helps to draw a centerline around the waistline and then use the card to mark off 1" on either side of the line.
STEP 5: Once we had both the vertical and horizontal lines sketched out, we then used the tape to create a border and filled our lines with the cherry red enamel paint. Let paint dry completely before moving on to the next step!
STEP 6: After the red paint has dried, mark off 1" around all of the red lines. This will help create the white line between the red and blue areas.
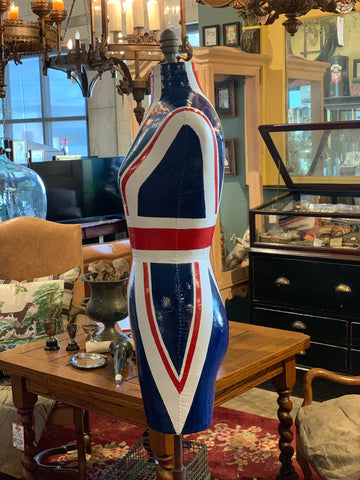
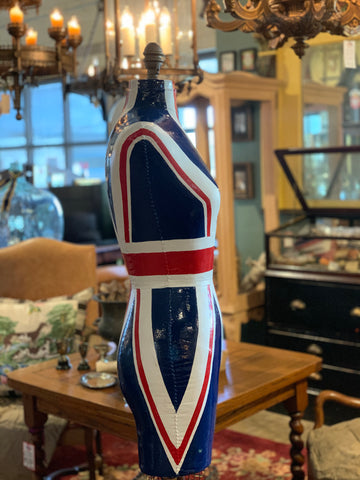
STEP 7: Using the corner on the waistline where the red horizontal and vertical line meet, pin a piece of string. Using the string, angle it out down towards the side of the mannequin. This mannequin had a seam line on the side that marked where the middle was on the side. We figured this was the best way to figure out how the angles should go for the bottom half. We then positioned the string at the edge, where the red horizontal and vertical line met on the top half. We then drew up towards the edge of the shoulder to get the triangle's outline. We then repeated this on all the sides to create the large blue triangles.
STEP 8: Once we had the triangles marked, we then taped off the borders and filled them with the dark blue paint. Let this dry completely before moving on to the next step.
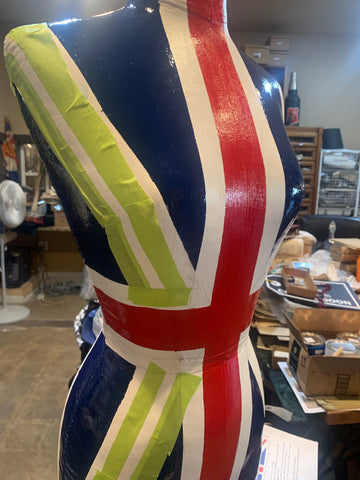
STEP 9: Where the blue triangles have been painted, mark off a 2" surround. This will be your 2" white line between the two blue markings.
STEP 10: Once you have the tape marked off the white line, it should outline the next blue triangle's spacing. Look at the picture to see what this means. Fill in the blue triangle and let dry before moving on to the next step.

STEP 11: You're almost done! Make a note of the narrow red lines on a true union jack flag. There is meaning behind how it is placed. On the top half of the mannequin, the narrow red line on the right side is painted closer to the bottom triangle. On the left side of the mannequin, the line is painted closer to the top triangle. On the bottom half, it's reversed. The right side is painted closer to the top triangle while the left side is painted closer to the bottom. Make sure to look at the pictures to see what we mean! The red line's size is 1/2" thick, and the white line between the triangle it's closest too is 1/4" thick. We used the business card again to make sure our line is the same width all the way through. Go slow when using your tape to section it off, as this will ensure a smooth line. Once you have it taped off, paint and then let dry.
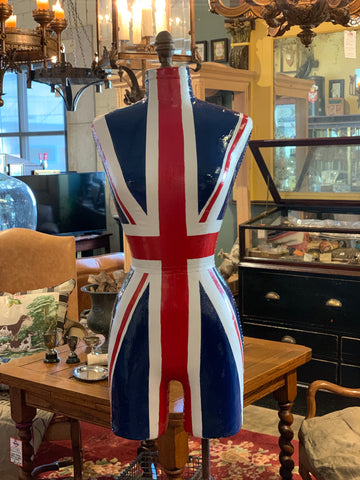
STEP 12: Once it's all painted, go back and touch up any white or painted triangles. After we touched ours up, we decided to finish it with a gloss sealer. You can quickly age your mannequin by rubbing on a dark wax and then wiping it off. We decided not to age it and instead go with a vibrant look.
STEP 13: Enjoy all of your hard work!
Let us know if you end up making a Union Jack mannequin! We'd love to see it!